Summer project: Turbho RB-50 Retro Scooter PART#1
Nice! (sometimes I also decide to post stuff in English)
139QMB Repair Tips + Story about the šperra :)
The model of the scoota' is TURBHO RB-50 2002 year edition. >> This is the very first picture taken 5.minutes after it was legally written on my name.
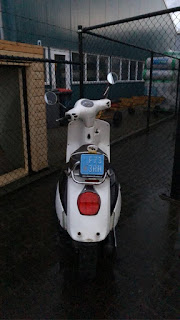

Lold,yea the number plate got broken off because somebody thought it could fit in the back of a VW Polo :D Nevermind that, it's hot and super glue attached back to it's place :)
Zoo , quick background:
Okay, so this scooter was bought on 1st of March 2020 , it had ran half past 14k on the clock before me. I'm the third owner. As I already predicted... there has been done nothing besides brakes were bled and topped off with brake fluid and engine oil was changed to a new one. (( The sad story about treatment of vehicles in the country where I reside and work [ NETHERLANDS ] is like this: mehh,I don't give a fuck! This piece of thing just moves me from point A to point B )) Ēm, It's not 100% for anyone of course , but mostly that's how things go here.... Well, Next Day Inspecting further I found out that the voltage regulator got replaced to an standard GY6 and guess what? Headlight bulb was installed from a car (70w/75w) and that brings a suprise of a nearly melted reflector , but fear not It still works and performs as it should, the top part got molten a little but it's cool , so good thing I managed to stop the electricity glitch on time. Sadly, but I don't have a picture of the damage done ,but let's carry on and time ying-ling all the stuff that will be maintained on tha' scooty! :)
Don't mind if the pictures are in wrong order , that's because at the moment while I'm composing this piece of art I'm still waiting for the 80cc cylinder kit and the "performance" ignition kit to arrive , so here we go:
Hmm,the very first thing that got changed was the bulb to an appropriate 30w/35w one.
Then an 60 euro not the best quality windshield got installed. Also, a new battery was required ,because the original one was leaking the acid-like fluid from the old chambers... And then' the things started to appear.
The second thing that really decided to do the squeak championship was the ignition key or contact group or whatever it is called correctly, the thing where you put in the key tho' .
I ordered replacement ,but they sent me the wrong one , turns out there are two generations of these TURBHO scooters :D and then I had to do some digging, but lucky me got the right one in the end. The newer generation on the left , the correct one is on the right (re-wiring wouldn't be an issue tho' , but the new one was lacking the ability to open the trunk with the key , so It got returned right back to the seller.
 After the correct replacement part arrived , I quickly replaced it and took the scooch for an' test-drive .... What the snap ? I have lost about 15km's from the Top speed , what , when , how ? I checked whether the 'ground' was okay, and yes , it was .... Then I decided to for unknown reasons adjust the valves .... Yeh , they were tight ,like with no clearance , but adjusting them never fixed the problem .... So I removed the air filter box , vacuumed it - no change... And then I found out that the carburetor is making some sort of jokes... If I quickly open the throttle it want's to bog-out but then it rev's up ..... Yep , took of the carburetor and guess what , the main jet was clogged , nice. Also the size of it was Ridiculous 82mm ... pretty damn lean , ignoring that I stickd' everything back together , fired it up and yee , nice the bogging is gone - let's go for a test-drive.... And ? Nope , same story... the top-speed is never like it was before ...
So , I decided to overhaul the scoot!
New stock piston , New Ignition stator , New gearbox elements, new fluids.
And you probably don't know me , but I tend to get 'caught up , fall in or ,nu , you know - Just go in the hazardous gamble .... Thing that tends to happen to me , so the 'overhaul' turned out to
+
New Air Filter,New Richer Carburetor jet's 94&98mm, New Cylinder and Head Kit transferring to 80cc bore size (just for fun) , New variator rolls , New variator belt , New Clutch Kit ,New Fuel filter, New fuel lines ,Correct Voltage regulator , New Ignition Kit including CDI,stator,spark plug wire and the spark plug itself , New intake manifold and just some mini tweaks like washing all the pre-war plastics from the inside , brushing off rusted spots and spraying them over with rust protective black color :D
After the correct replacement part arrived , I quickly replaced it and took the scooch for an' test-drive .... What the snap ? I have lost about 15km's from the Top speed , what , when , how ? I checked whether the 'ground' was okay, and yes , it was .... Then I decided to for unknown reasons adjust the valves .... Yeh , they were tight ,like with no clearance , but adjusting them never fixed the problem .... So I removed the air filter box , vacuumed it - no change... And then I found out that the carburetor is making some sort of jokes... If I quickly open the throttle it want's to bog-out but then it rev's up ..... Yep , took of the carburetor and guess what , the main jet was clogged , nice. Also the size of it was Ridiculous 82mm ... pretty damn lean , ignoring that I stickd' everything back together , fired it up and yee , nice the bogging is gone - let's go for a test-drive.... And ? Nope , same story... the top-speed is never like it was before ...
So , I decided to overhaul the scoot!
New stock piston , New Ignition stator , New gearbox elements, new fluids.
And you probably don't know me , but I tend to get 'caught up , fall in or ,nu , you know - Just go in the hazardous gamble .... Thing that tends to happen to me , so the 'overhaul' turned out to
+
New Air Filter,New Richer Carburetor jet's 94&98mm, New Cylinder and Head Kit transferring to 80cc bore size (just for fun) , New variator rolls , New variator belt , New Clutch Kit ,New Fuel filter, New fuel lines ,Correct Voltage regulator , New Ignition Kit including CDI,stator,spark plug wire and the spark plug itself , New intake manifold and just some mini tweaks like washing all the pre-war plastics from the inside , brushing off rusted spots and spraying them over with rust protective black color :D
So let the pictures and story flow further >:)
/me goes out of the apartment and notices a...
 Well,something that screams that it would like to be worked on!
So, unzipping the cover we see:
 There she is - the beaut of chinese craftsman - mmm , retro scooter , it's pretty dang cool to ride , believe me. I'm not joking here. I would love to change the shock in the rear in the future for high-quality cushion for the ass-wipe , but that's not a high priority at the moment. Probably will order and replace that somewhere around the end of the May.
Soooo,
I started off with the main basic thing - drain the engine oil , but gonna refill it only after installing the new cylinder kit :) The drain plug is at the bottom of the engine case , and this scenario is for all of the 139QMB engines. Be careful , there is an spring loaded mechanism that holds the 'oil filter'
 eww, it doesn't seem to be pretty new , anyways , no metallic chunks or any suspicious colors - so that's good :) .
Next one following is the gearbox oil.
Originally the color if it in fresh condition is transparent. Guess what color was the one I drained?
 Yes,you guessed it right - matte black .... ew
Please,make sure that you put in 75w90 oil back in there.
Yes,you guessed it right - matte black .... ew
Please,make sure that you put in 75w90 oil back in there.
 (Yup, I'm a fan of Krõõn-Oil , also use it on all my 4.wheel vehicles )
Now, an extra story about the gearbox.... oil topping plug - I did it , yep , could not calculate my fingers enough Newton metres and there I ended up with an broken thread - nice! :) That's just exactly what's needed in order not to hold the oil in it's desired chamber.... You know that there are some types of threads , ey?

So in my tool-box I found one with the cutting thread, the length was way out of the question , but I did some magic with the fleksis and made another bolt just like the un-usable one and fingers-crossed I hope it did the work, we'll see. I managed to tighten it pretty good , so that's already a 98% chance of success. Let's hope that no metallic chunks got inserted in between the gears tho.
This is how the block looks with the new mod :D
 Further I went and decided to take apart the whole vario system... And guess what? Exactly. 14k on these parts are not forgiving... Everything worn out like an sole of a sk8er shoe which is used for brakes when driving a moped.
Check out the rolls. Pretty 'round' huh? Guess that explains why there was 'sudden' loss of top-speed , lmao
 the vario kit in it's glory:
 Everything got sprayed down with best cleaning tool ever , because I will be using some of the parts in the future.
The 'cleaning agent'
Everything got sprayed down with best cleaning tool ever , because I will be using some of the parts in the future.
The 'cleaning agent'
 (yip, also used it to clean out out the variator cover)
The new rolls that got installed are : Malossi Performance Max Sickness 4.4g weights for a smoother ,sharper acceleration :) :)
(yip, also used it to clean out out the variator cover)
The new rolls that got installed are : Malossi Performance Max Sickness 4.4g weights for a smoother ,sharper acceleration :) :)

Kek, that was fun , now let's remove the clutch bell housing , and the clutch itself to reveal some more piece of shit pics :)
Ā jā, also , nevertheless to mention - you need a tool to hold down the moving parts , if you don't own an Impact Wrench.
 The variator key is a cool thing, let's see what was under the housing.
 *piu* just.... It's just worn , not till the end , yes , thanks , but it's not going to last 14k more that's for sure :D
 And here we have a compare with the new clutch.
Pretty neat , eh ? Also ,the new Clutch is NARAKU RACING one , I think it will perform better than the stock worn pi-pi.
Yummy, next off is that I found out that there was an factory 'limiter' which was cut out already ages before me , in order to avoid the 25km/h restriction , lawd.

I'll just clean the cover , and remove the piece for an impressive weight reduction .
Yupppi ,now there's everything bolted back on also with the new Naraku Performance Belt :)

.... Nice1. I noticed that the kick-start mechanism also was puked all around with the dust from the clutch pads , so I had to buy something I was not having in stock before.... The Grease. And guess what brand I bought?
Hm, PROTECT :D , by the color it reminds of [Krõõn Oilzzz] , but it's not tho.
 Also ,the new voltage regulator was just a click-click job , so there's no detailed description just a Pic
 In my dirty oily greasy fingered palm you can see the old voltage regulator ... the cooling system seems safer overall , but I'd like to stick with the 'factory' voltage regulations , thanks.
The new Intake manifold is also nothing special , I'd just like to point out that I decided to keep my engine healthy so the "egr" system will be removed totally ,so that's why the new part doesn't have the two vacuum inlets.
In my dirty oily greasy fingered palm you can see the old voltage regulator ... the cooling system seems safer overall , but I'd like to stick with the 'factory' voltage regulations , thanks.
The new Intake manifold is also nothing special , I'd just like to point out that I decided to keep my engine healthy so the "egr" system will be removed totally ,so that's why the new part doesn't have the two vacuum inlets.
 Let's see , while I'm waiting for the cylinder and Ignition kit's I could do some freshening-up stuff.
Like, changing the fuel/vacuum lines to transparent one's and installing a new fuel filter. Sadly I have a picture of half-way done job...
 Yes,you guessed it right. Red 'performance' tighteners all over the place , also will be used for wiring harness re-locations and some other stuff.
Oops,here's the second picture of the new fuel lines which got extended from 6mm to 8mm :)
 After:
Then I did some scrubbing on the variator cover.
After:
Then I did some scrubbing on the variator cover.
 Miiip! Piiip! Skiiip!
!!!WARNING!!! Always, wear protective gear while working with stuff that will fly around.
 Yep,that's Alvis. Wearing eye protective glasses.
Okay,it seems like I have finished scraping the crap out of it , bolted it back on the engine , and probably will upload the 'finished' pics at the bottom of this whole story. Just to mention - for anti-dust sealing agent I used this product:
Yep,that's Alvis. Wearing eye protective glasses.
Okay,it seems like I have finished scraping the crap out of it , bolted it back on the engine , and probably will upload the 'finished' pics at the bottom of this whole story. Just to mention - for anti-dust sealing agent I used this product:
 I know it's an overkill application ,but did not have anything else at the hand! So no angers there.
After the cover I decided to freshen up the places where the foot resting plastic attaches.
I know it's an overkill application ,but did not have anything else at the hand! So no angers there.
After the cover I decided to freshen up the places where the foot resting plastic attaches.
 They all are going to be covered with protective black power spray , I'll take the pics' tommoro' and probably will edit this part.
Friggle sticks!
That's right , for covering rusty spots I used this spray'er
 And here the plastic madness, dang ,those things are pretty filthy
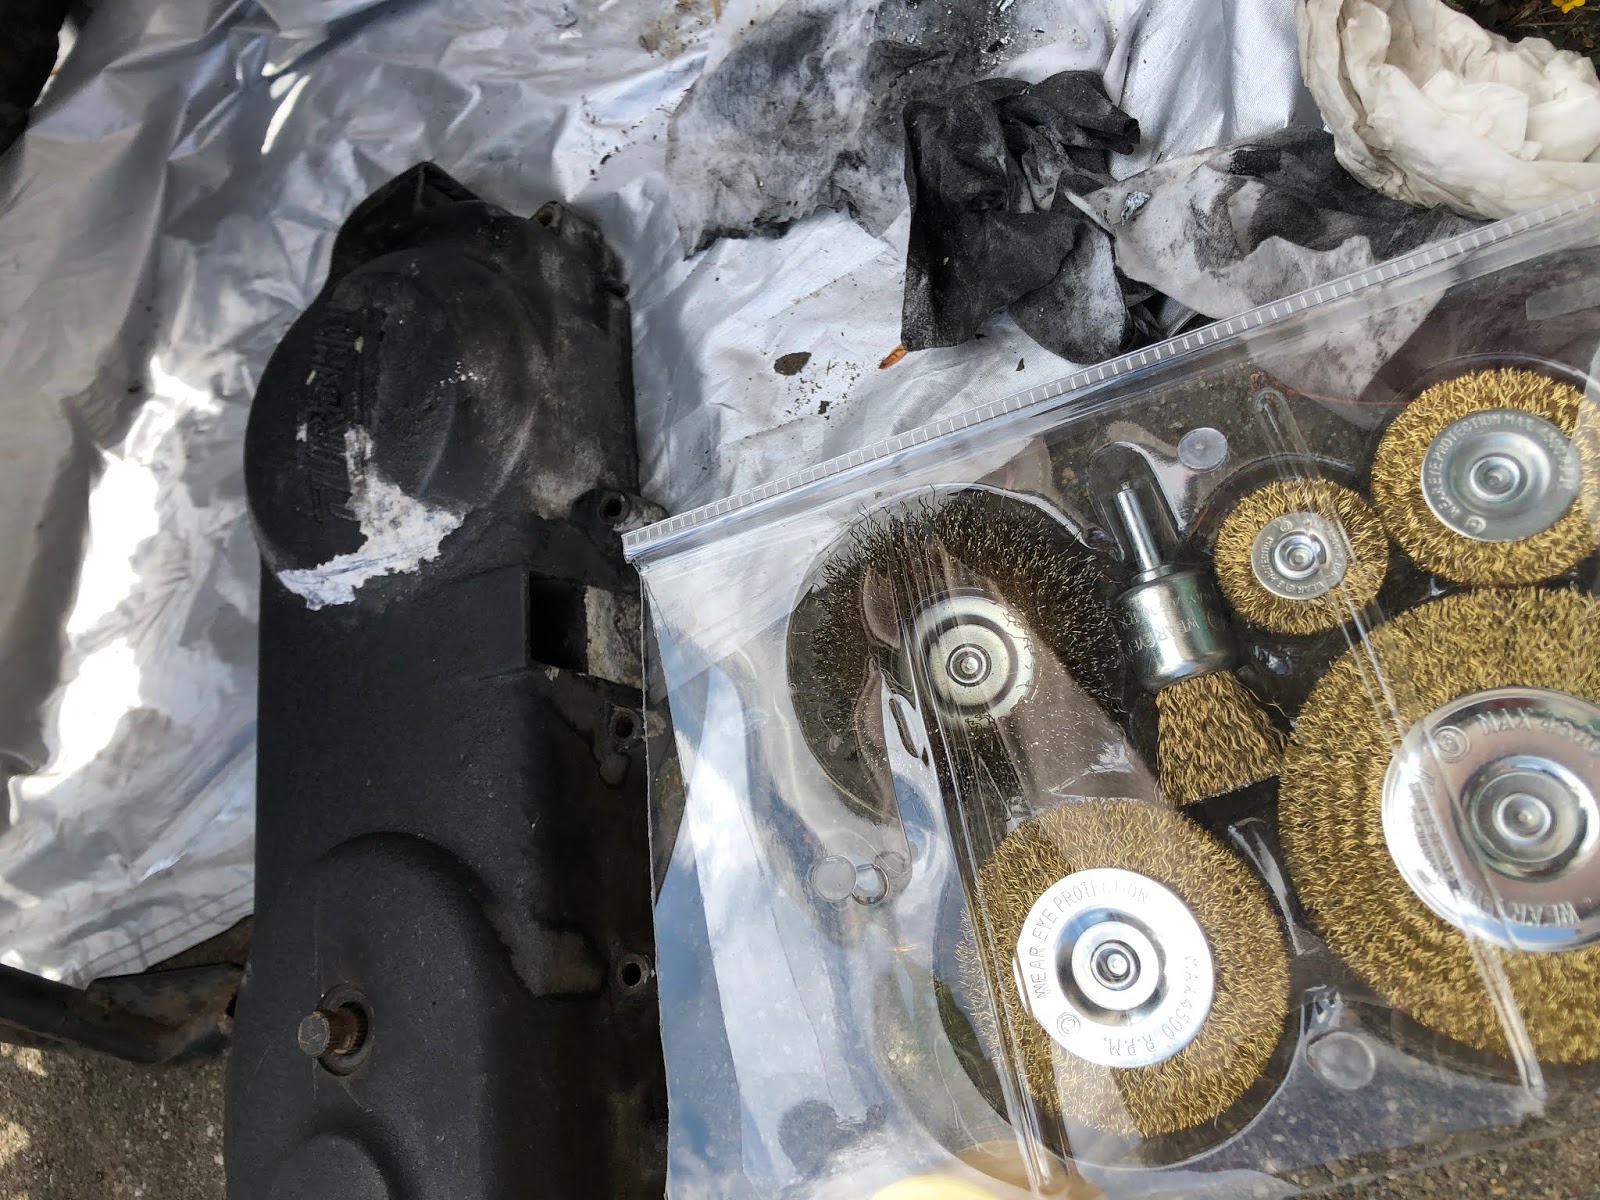
 So , to scrub all that dirt away I used this iconic appliance :D
 And the next picture is blurry , because I did not do the job with highest performance, so I'd say they are 80 percent clean instead of 100 how lazy , I kno'
 Then there's this wonderful Pic with the new performance Air Filter installed on the carb! :)
 Looks sporty, ne ?
I can't even stress it enough how impatiently I'm waiting to hear the engine sound with the new setup! Yiiihu!
Next One: While I'm waiting for the parts I'm going to turn the engine over clock-wise by the magneto to the "Top Dead Centre" or known as TDC location , so It's set ready for the replacement of the cylinder... the scoot outside is idling covered with car cover , so no worries of dust or damage to enter the crankshaft sleeping bed. When you remove the fan-cover which helps the air-cooled engines to cool , you reveal the master system engineering which make's sure you have the spark on your beast. There is the round thingy and it's called the magneto.
The magneto must be facing the "Timing" mark against a mark on the engine block
 And when you remove the valve head cover and see a picture like this
 You can be 201% that you have done the work precisely and it's ready for disassembly or if not , you can adjust the Valve clearance at this step.
Allrighty , here I'm gonna stop , save the whole pice as Draft and edit it in the near future , when I have the rest of the parts and updated pic's :) :) :) Yuppp!
Currently I'm on my Vacation , this is 20/06/2020... and let me just get on with sharing some more worrying words and pic's.
One day before my vacation started i finally received the long awaited part : 80cc cylinder kit with the head! :O
 So , after a good two-three weeks sitting the scooter finally could breathe some of the fine nature air.

So , finally I could start undoing all the bolts from the old cylinder and head .... and you ain't gonna believe what I saw. Yep,It's...I mean... some serious damage on the head ... yep

Well,it seemed kinda fine (not) so I just threw it in with the rest of trash at box labeled "spare parts" :D
Hmmm , the valves seem to be having some sort of delicious 'burn-up' , that's not too bad either.
 Let's see the compared bore size of the old and new cylinder. Yep, not too much of a difference.
 Make sure that you really want to lubricate everything with oil , before assembling everything together.
 I wanted to do the right thing and finish everything quickly,just before taking off to another Country for a vacation , trying to see if it fires just putting everything together waay quick... Oh yeah .... DID NOT HAVE INFO!! I fell in two problems already, so there was no successful "FIRST START" with the exhaust off n stuff.... Turns out the 139QMB engines have two types of valve arm rockers , there are ones with shorter "knuckles" and longer one's - The upgraded 80cc requires the big version! ... Great , let's just order up some more stuff!
I also fell Victim of highly flooding carb , did not bother to re-build it , So just skipping it: I bought a new bigger 24mm carb and also bigger intake manifold for making things work....
I wanted to do the right thing and finish everything quickly,just before taking off to another Country for a vacation , trying to see if it fires just putting everything together waay quick... Oh yeah .... DID NOT HAVE INFO!! I fell in two problems already, so there was no successful "FIRST START" with the exhaust off n stuff.... Turns out the 139QMB engines have two types of valve arm rockers , there are ones with shorter "knuckles" and longer one's - The upgraded 80cc requires the big version! ... Great , let's just order up some more stuff!
I also fell Victim of highly flooding carb , did not bother to re-build it , So just skipping it: I bought a new bigger 24mm carb and also bigger intake manifold for making things work....
 Oh and now it looks that I'm gonna also need to buy a new throttle cable for the big carb ,because the stock one is too short .... Well ,maybe I can find a work around , I'll check.
So , as I'm rolling to Latvia for an holiday:
Oh and now it looks that I'm gonna also need to buy a new throttle cable for the big carb ,because the stock one is too short .... Well ,maybe I can find a work around , I'll check.
So , as I'm rolling to Latvia for an holiday:
A guy just locked the scooter in "bicycle box" and brought all the plastic pieces inside the apartment because of limited space at the box.

To be honest, I already had confusing suspicion , that something is going too good and too quick .... Yeah... like that , so I'll just pretend that I stopped my project just here , but in truth I'll be heading back to NL in couple of day's and return to finishing the project and posting first start vid ;)
Anyways , it's time to finish up this Post and Publish it , because it's been laying in the "Drafts" section for waay to long and I'm getting this feeling like: Hmm,I don't like it there. Same like: randomly deleting messages because "I don't like that they stay there"
I'm pretty sure next time we can get off on better foot ;)
I'll try to scatter the text and thoughts together much more fairly readable , I hope.
Cheers !
04/07/2020 Update:
One week after return I have decided to order the new Valve Rocker Arm , a fresh Valve Head Cover and proper Ignition Coil with a spark wire for the fine fire of the spark :)
Can't wait for the first engine sounds , let's get this baby alive !!!
Okay, so this scooter was bought on 1st of March 2020 , it had ran half past 14k on the clock before me. I'm the third owner. As I already predicted... there has been done nothing besides brakes were bled and topped off with brake fluid and engine oil was changed to a new one. (( The sad story about treatment of vehicles in the country where I reside and work [ NETHERLANDS ] is like this: mehh,I don't give a fuck! This piece of thing just moves me from point A to point B )) Ēm, It's not 100% for anyone of course , but mostly that's how things go here.... Well, Next Day Inspecting further I found out that the voltage regulator got replaced to an standard GY6 and guess what? Headlight bulb was installed from a car (70w/75w) and that brings a suprise of a nearly melted reflector , but fear not It still works and performs as it should, the top part got molten a little but it's cool , so good thing I managed to stop the electricity glitch on time. Sadly, but I don't have a picture of the damage done ,but let's carry on and time ying-ling all the stuff that will be maintained on tha' scooty! :)
Don't mind if the pictures are in wrong order , that's because at the moment while I'm composing this piece of art I'm still waiting for the 80cc cylinder kit and the "performance" ignition kit to arrive , so here we go:
Don't mind if the pictures are in wrong order , that's because at the moment while I'm composing this piece of art I'm still waiting for the 80cc cylinder kit and the "performance" ignition kit to arrive , so here we go:
Hmm,the very first thing that got changed was the bulb to an appropriate 30w/35w one.
Then an 60 euro not the best quality windshield got installed. Also, a new battery was required ,because the original one was leaking the acid-like fluid from the old chambers... And then' the things started to appear.
The second thing that really decided to do the squeak championship was the ignition key or contact group or whatever it is called correctly, the thing where you put in the key tho' .
I ordered replacement ,but they sent me the wrong one , turns out there are two generations of these TURBHO scooters :D and then I had to do some digging, but lucky me got the right one in the end. The newer generation on the left , the correct one is on the right (re-wiring wouldn't be an issue tho' , but the new one was lacking the ability to open the trunk with the key , so It got returned right back to the seller.

After the correct replacement part arrived , I quickly replaced it and took the scooch for an' test-drive .... What the snap ? I have lost about 15km's from the Top speed , what , when , how ? I checked whether the 'ground' was okay, and yes , it was .... Then I decided to for unknown reasons adjust the valves .... Yeh , they were tight ,like with no clearance , but adjusting them never fixed the problem .... So I removed the air filter box , vacuumed it - no change... And then I found out that the carburetor is making some sort of jokes... If I quickly open the throttle it want's to bog-out but then it rev's up ..... Yep , took of the carburetor and guess what , the main jet was clogged , nice. Also the size of it was Ridiculous 82mm ... pretty damn lean , ignoring that I stickd' everything back together , fired it up and yee , nice the bogging is gone - let's go for a test-drive.... And ? Nope , same story... the top-speed is never like it was before ...
So , I decided to overhaul the scoot!
New stock piston , New Ignition stator , New gearbox elements, new fluids.
And you probably don't know me , but I tend to get 'caught up , fall in or ,nu , you know - Just go in the hazardous gamble .... Thing that tends to happen to me , so the 'overhaul' turned out to
+
New Air Filter,New Richer Carburetor jet's 94&98mm, New Cylinder and Head Kit transferring to 80cc bore size (just for fun) , New variator rolls , New variator belt , New Clutch Kit ,New Fuel filter, New fuel lines ,Correct Voltage regulator , New Ignition Kit including CDI,stator,spark plug wire and the spark plug itself , New intake manifold and just some mini tweaks like washing all the pre-war plastics from the inside , brushing off rusted spots and spraying them over with rust protective black color :D
So let the pictures and story flow further >:)
/me goes out of the apartment and notices a...
So let the pictures and story flow further >:)
/me goes out of the apartment and notices a...

Well,something that screams that it would like to be worked on!
So, unzipping the cover we see:
So, unzipping the cover we see:

There she is - the beaut of chinese craftsman - mmm , retro scooter , it's pretty dang cool to ride , believe me. I'm not joking here. I would love to change the shock in the rear in the future for high-quality cushion for the ass-wipe , but that's not a high priority at the moment. Probably will order and replace that somewhere around the end of the May.
Soooo,
I started off with the main basic thing - drain the engine oil , but gonna refill it only after installing the new cylinder kit :) The drain plug is at the bottom of the engine case , and this scenario is for all of the 139QMB engines. Be careful , there is an spring loaded mechanism that holds the 'oil filter'

eww, it doesn't seem to be pretty new , anyways , no metallic chunks or any suspicious colors - so that's good :) .
Next one following is the gearbox oil.
Originally the color if it in fresh condition is transparent. Guess what color was the one I drained?
Next one following is the gearbox oil.
Originally the color if it in fresh condition is transparent. Guess what color was the one I drained?

Yes,you guessed it right - matte black .... ew
Please,make sure that you put in 75w90 oil back in there.

(Yup, I'm a fan of Krõõn-Oil , also use it on all my 4.wheel vehicles )
Now, an extra story about the gearbox.... oil topping plug - I did it , yep , could not calculate my fingers enough Newton metres and there I ended up with an broken thread - nice! :) That's just exactly what's needed in order not to hold the oil in it's desired chamber.... You know that there are some types of threads , ey?

So in my tool-box I found one with the cutting thread, the length was way out of the question , but I did some magic with the fleksis and made another bolt just like the un-usable one and fingers-crossed I hope it did the work, we'll see. I managed to tighten it pretty good , so that's already a 98% chance of success. Let's hope that no metallic chunks got inserted in between the gears tho.
This is how the block looks with the new mod :D

Further I went and decided to take apart the whole vario system... And guess what? Exactly. 14k on these parts are not forgiving... Everything worn out like an sole of a sk8er shoe which is used for brakes when driving a moped.
Check out the rolls. Pretty 'round' huh? Guess that explains why there was 'sudden' loss of top-speed , lmao
Check out the rolls. Pretty 'round' huh? Guess that explains why there was 'sudden' loss of top-speed , lmao

the vario kit in it's glory:

Everything got sprayed down with best cleaning tool ever , because I will be using some of the parts in the future.
The 'cleaning agent'

(yip, also used it to clean out out the variator cover)
The new rolls that got installed are : Malossi Performance Max Sickness 4.4g weights for a smoother ,sharper acceleration :) :)

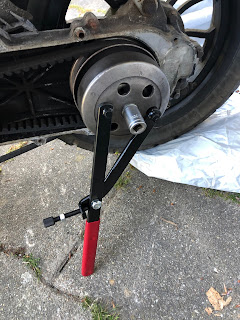
Kek, that was fun , now let's remove the clutch bell housing , and the clutch itself to reveal some more piece of shit pics :)
Ā jā, also , nevertheless to mention - you need a tool to hold down the moving parts , if you don't own an Impact Wrench.

The variator key is a cool thing, let's see what was under the housing.

*piu* just.... It's just worn , not till the end , yes , thanks , but it's not going to last 14k more that's for sure :D

And here we have a compare with the new clutch.
Pretty neat , eh ? Also ,the new Clutch is NARAKU RACING one , I think it will perform better than the stock worn pi-pi.
Pretty neat , eh ? Also ,the new Clutch is NARAKU RACING one , I think it will perform better than the stock worn pi-pi.
Yummy, next off is that I found out that there was an factory 'limiter' which was cut out already ages before me , in order to avoid the 25km/h restriction , lawd.

I'll just clean the cover , and remove the piece for an impressive weight reduction .
Yupppi ,now there's everything bolted back on also with the new Naraku Performance Belt :)

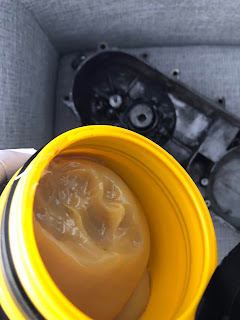
.... Nice1. I noticed that the kick-start mechanism also was puked all around with the dust from the clutch pads , so I had to buy something I was not having in stock before.... The Grease. And guess what brand I bought?
Hm, PROTECT :D , by the color it reminds of [Krõõn Oilzzz] , but it's not tho.
Hm, PROTECT :D , by the color it reminds of [Krõõn Oilzzz] , but it's not tho.

Also ,the new voltage regulator was just a click-click job , so there's no detailed description just a Pic

In my dirty oily greasy fingered palm you can see the old voltage regulator ... the cooling system seems safer overall , but I'd like to stick with the 'factory' voltage regulations , thanks.
The new Intake manifold is also nothing special , I'd just like to point out that I decided to keep my engine healthy so the "egr" system will be removed totally ,so that's why the new part doesn't have the two vacuum inlets.

Let's see , while I'm waiting for the cylinder and Ignition kit's I could do some freshening-up stuff.
Like, changing the fuel/vacuum lines to transparent one's and installing a new fuel filter. Sadly I have a picture of half-way done job...
Like, changing the fuel/vacuum lines to transparent one's and installing a new fuel filter. Sadly I have a picture of half-way done job...

Yes,you guessed it right. Red 'performance' tighteners all over the place , also will be used for wiring harness re-locations and some other stuff.
Oops,here's the second picture of the new fuel lines which got extended from 6mm to 8mm :)
Oops,here's the second picture of the new fuel lines which got extended from 6mm to 8mm :)

After:
Then I did some scrubbing on the variator cover.
Miiip! Piiip! Skiiip!
!!!WARNING!!! Always, wear protective gear while working with stuff that will fly around.
!!!WARNING!!! Always, wear protective gear while working with stuff that will fly around.

Yep,that's Alvis. Wearing eye protective glasses.
Okay,it seems like I have finished scraping the crap out of it , bolted it back on the engine , and probably will upload the 'finished' pics at the bottom of this whole story. Just to mention - for anti-dust sealing agent I used this product:

I know it's an overkill application ,but did not have anything else at the hand! So no angers there.
After the cover I decided to freshen up the places where the foot resting plastic attaches.

They all are going to be covered with protective black power spray , I'll take the pics' tommoro' and probably will edit this part.
Friggle sticks!
Friggle sticks!
That's right , for covering rusty spots I used this spray'er

And here the plastic madness, dang ,those things are pretty filthy

So , to scrub all that dirt away I used this iconic appliance :D

And the next picture is blurry , because I did not do the job with highest performance, so I'd say they are 80 percent clean instead of 100 how lazy , I kno'

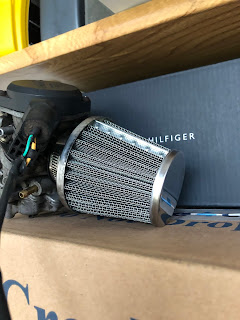
Then there's this wonderful Pic with the new performance Air Filter installed on the carb! :)

Looks sporty, ne ?
I can't even stress it enough how impatiently I'm waiting to hear the engine sound with the new setup! Yiiihu!
I can't even stress it enough how impatiently I'm waiting to hear the engine sound with the new setup! Yiiihu!
Next One: While I'm waiting for the parts I'm going to turn the engine over clock-wise by the magneto to the "Top Dead Centre" or known as TDC location , so It's set ready for the replacement of the cylinder... the scoot outside is idling covered with car cover , so no worries of dust or damage to enter the crankshaft sleeping bed. When you remove the fan-cover which helps the air-cooled engines to cool , you reveal the master system engineering which make's sure you have the spark on your beast. There is the round thingy and it's called the magneto.
The magneto must be facing the "Timing" mark against a mark on the engine block

And when you remove the valve head cover and see a picture like this

You can be 201% that you have done the work precisely and it's ready for disassembly or if not , you can adjust the Valve clearance at this step.
Allrighty , here I'm gonna stop , save the whole pice as Draft and edit it in the near future , when I have the rest of the parts and updated pic's :) :) :) Yuppp!
Currently I'm on my Vacation , this is 20/06/2020... and let me just get on with sharing some more worrying words and pic's.
One day before my vacation started i finally received the long awaited part : 80cc cylinder kit with the head! :O
Currently I'm on my Vacation , this is 20/06/2020... and let me just get on with sharing some more worrying words and pic's.
One day before my vacation started i finally received the long awaited part : 80cc cylinder kit with the head! :O

So , after a good two-three weeks sitting the scooter finally could breathe some of the fine nature air.

So , finally I could start undoing all the bolts from the old cylinder and head .... and you ain't gonna believe what I saw. Yep,It's...I mean... some serious damage on the head ... yep

Well,it seemed kinda fine (not) so I just threw it in with the rest of trash at box labeled "spare parts" :D
Hmmm , the valves seem to be having some sort of delicious 'burn-up' , that's not too bad either.

Let's see the compared bore size of the old and new cylinder. Yep, not too much of a difference.

Make sure that you really want to lubricate everything with oil , before assembling everything together.

I wanted to do the right thing and finish everything quickly,just before taking off to another Country for a vacation , trying to see if it fires just putting everything together waay quick... Oh yeah .... DID NOT HAVE INFO!! I fell in two problems already, so there was no successful "FIRST START" with the exhaust off n stuff.... Turns out the 139QMB engines have two types of valve arm rockers , there are ones with shorter "knuckles" and longer one's - The upgraded 80cc requires the big version! ... Great , let's just order up some more stuff!
I also fell Victim of highly flooding carb , did not bother to re-build it , So just skipping it: I bought a new bigger 24mm carb and also bigger intake manifold for making things work....
Oh and now it looks that I'm gonna also need to buy a new throttle cable for the big carb ,because the stock one is too short .... Well ,maybe I can find a work around , I'll check.
So , as I'm rolling to Latvia for an holiday:A guy just locked the scooter in "bicycle box" and brought all the plastic pieces inside the apartment because of limited space at the box.

To be honest, I already had confusing suspicion , that something is going too good and too quick .... Yeah... like that , so I'll just pretend that I stopped my project just here , but in truth I'll be heading back to NL in couple of day's and return to finishing the project and posting first start vid ;)
Anyways , it's time to finish up this Post and Publish it , because it's been laying in the "Drafts" section for waay to long and I'm getting this feeling like: Hmm,I don't like it there. Same like: randomly deleting messages because "I don't like that they stay there"
Anyways , it's time to finish up this Post and Publish it , because it's been laying in the "Drafts" section for waay to long and I'm getting this feeling like: Hmm,I don't like it there. Same like: randomly deleting messages because "I don't like that they stay there"
I'm pretty sure next time we can get off on better foot ;)
I'll try to scatter the text and thoughts together much more fairly readable , I hope.
Cheers !
04/07/2020 Update:
One week after return I have decided to order the new Valve Rocker Arm , a fresh Valve Head Cover and proper Ignition Coil with a spark wire for the fine fire of the spark :)
Can't wait for the first engine sounds , let's get this baby alive !!!
One week after return I have decided to order the new Valve Rocker Arm , a fresh Valve Head Cover and proper Ignition Coil with a spark wire for the fine fire of the spark :)
Can't wait for the first engine sounds , let's get this baby alive !!!


Comments
Post a Comment